I’ve had the opportunity lately to do something that I haven’t been able to do in a very long time – ART!
There are few things as much fun as taking brilliant colors mixing them on paper to create wonderful things. It is important for children to have the opportunity to just play with color, and discover the the wonder of it while learning how color works and blends. That is the very best way to learn color theory.
These days there are a multitude of resources available with which to play with color. I’ve come across some great ones recently, and wanted to share.
One fun resource I discovered is Chameleon. In this case it isn’t the lizard (Although I’ve always thought it would be cool to have one of those, too.). Chameleon markers are alcohol-based markers that blend two or more colors together as the marker is drawn across the paper. They are really cool, but also, like most art supplies, expensive. Here’s a video that shows how they work:
That’s pretty cool, right. But I’m a librarian, so these markers are outside of my price range for craft supplies. That’s OK, though, watching how these markers work gave me, and many other creative people an idea…What would happen if you touched the tips of regular, affordable markers, together the same way? Guess what. The same thing! Here’s another video about the Chameleon markers, but feel free to skip forward to around 11:30 or so. That’s where the interesting bit begins. The first part of the video is about the artist pens, but the last part is the really great part where the author experiments with children’s markers, and shares what happened when she showed the kids in her son’s class at school how to touch two colors tip to tip and then draw with them.
There are also other ways to blend with markers. Many artist marker sets come with a ‘colorless blender.’ The blender can be used to blend the colors from multiple markers without touching the markers together. A paintbrush can do the same thing with water-based markers. Here is another video of an artist demonstrating multiple ways to use children’s markers to blend colors and shade.
The big thing to remember is that these activities work with water-based markers. Alcohol markers are different, and these techniques won’t work with them.
There are other ways to have fun with markers and experiment with color.
Coffee filters are great for discovering the colors hiding in markers, especially the black ones. Begin by drawing a circle or design on the filter in the area where the flat center and the ruffled sides meet. Then fold or roll the filter into a cone and rest in in the neck of a jar or cup of water so that only the point of the cone touches the water. As capillary action draws the water up into the filter, the pigments in the ink separate and travel upward toward the top edges of the filters with the water. The process is called chromatography. Depending on the brand of marker and the color used, it can be quite dramatic.
Here are some videos demonstrating chromatography:
Once the colors have finished separating and traveling up the filter, the filter can be hung up or spread on newspaper or paper towels to dry, then used in other crafts.
I have also gotten the filters wet first and laid them out on a plate, then dotted color all over them with markers to get an interesting spreading spots effect all over the filter. For this activity, you have to dot the filter, as drawing on some coffee filters will tear them.
Here’s a variation of the same activity:
Another fun marker craft idea is marker spinners. This activity is fun, engaging, and exercises manual dexterity. Start out by cutting cardboard or cardstock into circles 3-4′ in diameter. Poke a hole in the center of the circle and push the marker through. The next part is easy – take the cap off and spin the marker like a top, preferably on a large piece of paper. Depending on the size of the marker, cd’s could also be used. I think I would use some tacky putty (the stuff used to stick papers to the wall without using thumb tacks) to secure and stabilize the markers.
For those who prefer pictures, like me, here’s a video I found demonstrating the activity:
How many times have children tried to hold more than one marker at the same time and draw? It’s a fun activity, but can be quite challenging for smaller hands. Two or more markers can be held together with rubber bands to make it easier. With rubber bands the amount and colors of the markers can be easily changed.
Another method of drawing with multiple markers at the same time makes use of toilet paper rolls:
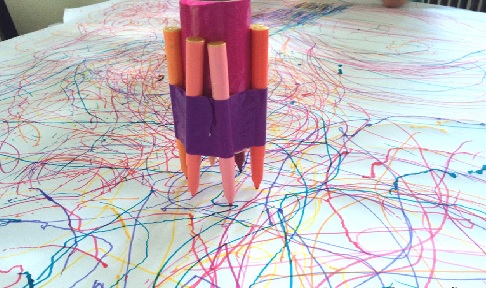
Duct tape is wrapped around a toilet paper roll. Then another strip of the tape is laid out, sticky side up. Markers are placed on the second piece of tape, and that piece is wrapped around the toilet paper roll.
These are great art activities that can be done with water-based markers, a resource that is readily available and affordable, and which nearly every child (and adult) enjoys.

Leave A Comment